On writing a network stack (2/2)
Freiburg, GermanyI am writing a minimum viable network stack from scratch for ArvernOS (a UNIX-like toy kernel). This two-part story describes some protocols of the TCP/IP stack as well as some implementation details in the context of ArvernOS.
In Part 1 of this two-part story, I presented some of the network protocols that I implemented when I started writing a network stack from scratch. In this second part, I continue to climb the different layers of this stack. After having introduced UDP, I’ll describe two “high” level network protocols: DHCP and DNS.
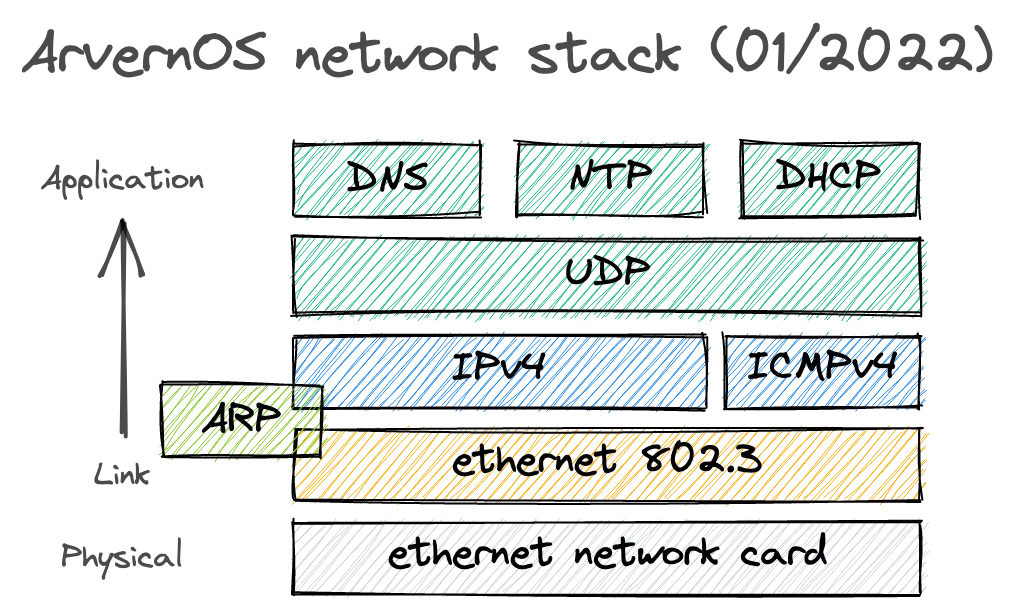 Figure 1: ArvernOS network stack in (early) 2022, which is divided into 5
layers (the TCP/IP model sits on top of a physical layer)
Figure 1: ArvernOS network stack in (early) 2022, which is divided into 5
layers (the TCP/IP model sits on top of a physical layer)
Figure 1 depicts the 5 different layers/protocols already implemented in ArvernOS: I chose to have a first distinct physical layer, and then we have the 4 layers of the TCP/IP model. This makes the first 4 layers of this model similar to the OSI model as well.
Again, each implementation is far from perfect but it is functional to some extents.
User Datagram Protocol (UDP)
UDP is a communication protocol listed in the Transport layer of the TCP/IP model. This protocol is “not connected”, which means there is no end-to-end connection. It is considered unreliable because packets could be lost and the emitter wouldn’t have any (built-in) way to know that. On the other hand, this makes UDP simpler to implement (compared to TCP for instance).
💡 UDP in ArvernOS
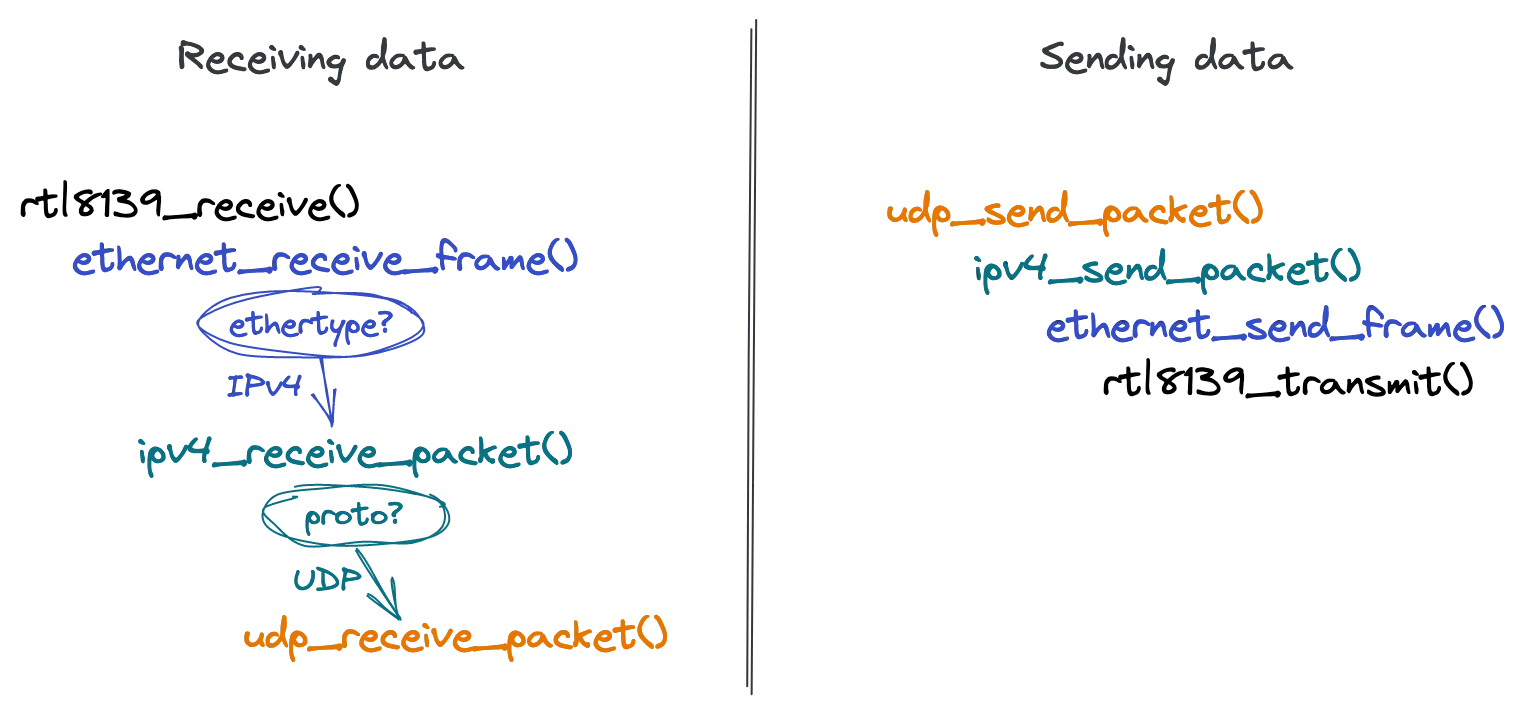 Figure 2: The UDP implementation (Layer 4 in my model) is invoked by the lower
layers on data received and relies on the other lower layers to send data
Figure 2: The UDP implementation (Layer 4 in my model) is invoked by the lower
layers on data received and relies on the other lower layers to send data
Like the other protocols introduced in the first article, the UDP implementation provides a pair of functions to send and receive data as depicted in Figure 2.
When receiving new packets, the udp_receive_packet()
function is called by the IPv4 code when the protocol number in an IPv4
packet is 17. The second function, udp_send_packet(),
allows to transmit UDP datagrams. Most of the code in this function is about
computing a pseudo header checksum, which took me quite some time to get right.
Wireshark seems happy now, though.
As far as I can remember, this initial UDP implementation was designed to [explore DNS]1 (another protocol that I describe later in this article). Initially, it was only possible to receive UDP packets based on the destination port. Later, I added the concept of sockets and the UDP logic was adjusted a bit to retrieve the right socket for each packet received. That was an interesting problem so let’s talk about it in the next section.
Handling incoming packets
On many systems, sockets are used by a process to communicate with other processes (which can be running on different machines). In reality, when a user space application uses a socket, it only talks to the kernel network stack. The kernel is the one dealing with the hardware and the low level bits.
When the kernel receives incoming data on a network interface, it needs to know where to send the data next. In most cases, an application in the user space needs the data and that’s where sockets are useful. “All” the kernel has to do is to retrieve the right socket given an incoming packet. It is easier said than done, though.
In ArvernOS, socket descriptors own the relevant information (protocol, port,
etc.) to be able to retrieve a socket given an incoming packet. This is
currently done by calling descriptor_udp_lookup() in
udp_receive_packet(). In order to support “raw” sockets, this
PR adds a similar call to descriptor_raw_lookup() in
ipv4_receive_packet().
In Linux, it is a bit different. In a Linux network driver, the incoming
data is encapsulated into a sk_buff structure, which is eventually
passed to the netif_rx() or netif_receive_skb() function. This
is where the incoming packet starts to actually “climb” the network stack. For
UDP, the function [__udp4_lib_lookup()][__udp4_lib_lookup] describes how the
kernel retrieves a socket for a given UDP packet. The way Linux calls this
function and forwards the packet to the socket is a bit hard to follow but this article
explains it well.
Domain Name System (DNS)
DNS is a protocol used to associate a domain name with an IP address. Some
people thought it’d be easier to remember github.com than 140.82.121.4. I
would recommend to read [Julia Evans’ tweets about DNS]2 if you
want to learn more about this protocol from a “user perspective”. She covered
many aspects of it!
DNS is part of the Application layer in the TCP/IP stack. It relies on a transport protocol to issue DNS queries. UDP (on port 53) is widely used and that’s what I implemented in ArvernOS. That being said, there are newer transport protocols available for DNS like DNS over HTTPS (DoH).
💡 DNS in ArvernOS
I followed these great DNS Primer notes to implement DNS in
ArvernOS (see: kernel/net/dns.c). ArvernOS currently offers a single
function named dns_lookup() to perform a blocking DNS lookup for a given
domain name.
This function is also exposed to user space thanks to the
gethostbyname2 system call, and the host
program shows how that can be used:
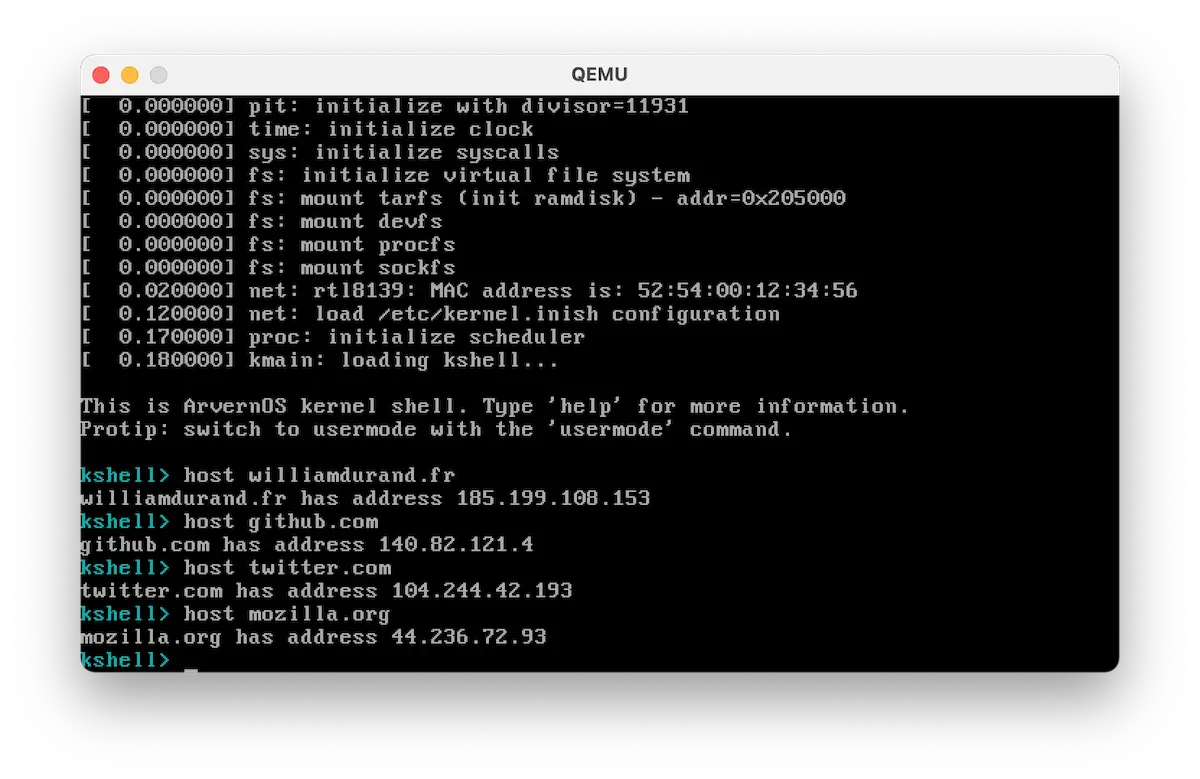 Figure 3: ArvernOS (x86_64) running in QEMU. The
 host command has been
executed several times with different domain names
Dynamic Host Configuration Protocol (DHCP)
DHCP is another protocol of the Application layer in TCP/IP, mainly used to automatically assign IP addresses to devices in a network. DHCP relies on UDP, and it works with 4 sequential “operations”:
-
Machine A advertises itself on the network. Something like this:
Hello? Hellooo?
-
If a DHCP server receives this request, it will make an offer:
Hey, I am the DHCP server. How about you use 192.168.1.234 as IP address? By the way, my IP is 192.168.1.1.
-
Machine A accepts the offer by explicitly requesting the IP address:
Okay, thanks DHCP server. Hello everyone, I am 192.168.1.234.
-
Last, the DHCP server acknowledges the request.
Got it!
From there, machine A has an IP address assigned. Wikipedia says DHCP is built on top of BOOTP, which stands for BOOTstrap Protocol. As such, it can be used to negotiate more information than just its own IP address.
Most of the time, it will be used to get an IP address, the IP of the gateway (“router”) and one or more DNS server IP addresses. The client should store the different IPs and use ARP to get the corresponding MAC addresses.
At this point, the machine should be able to talk to the gateway and the local DNS servers. This should be enough to reach the Internet!
💡 DHCP in ArvernOS
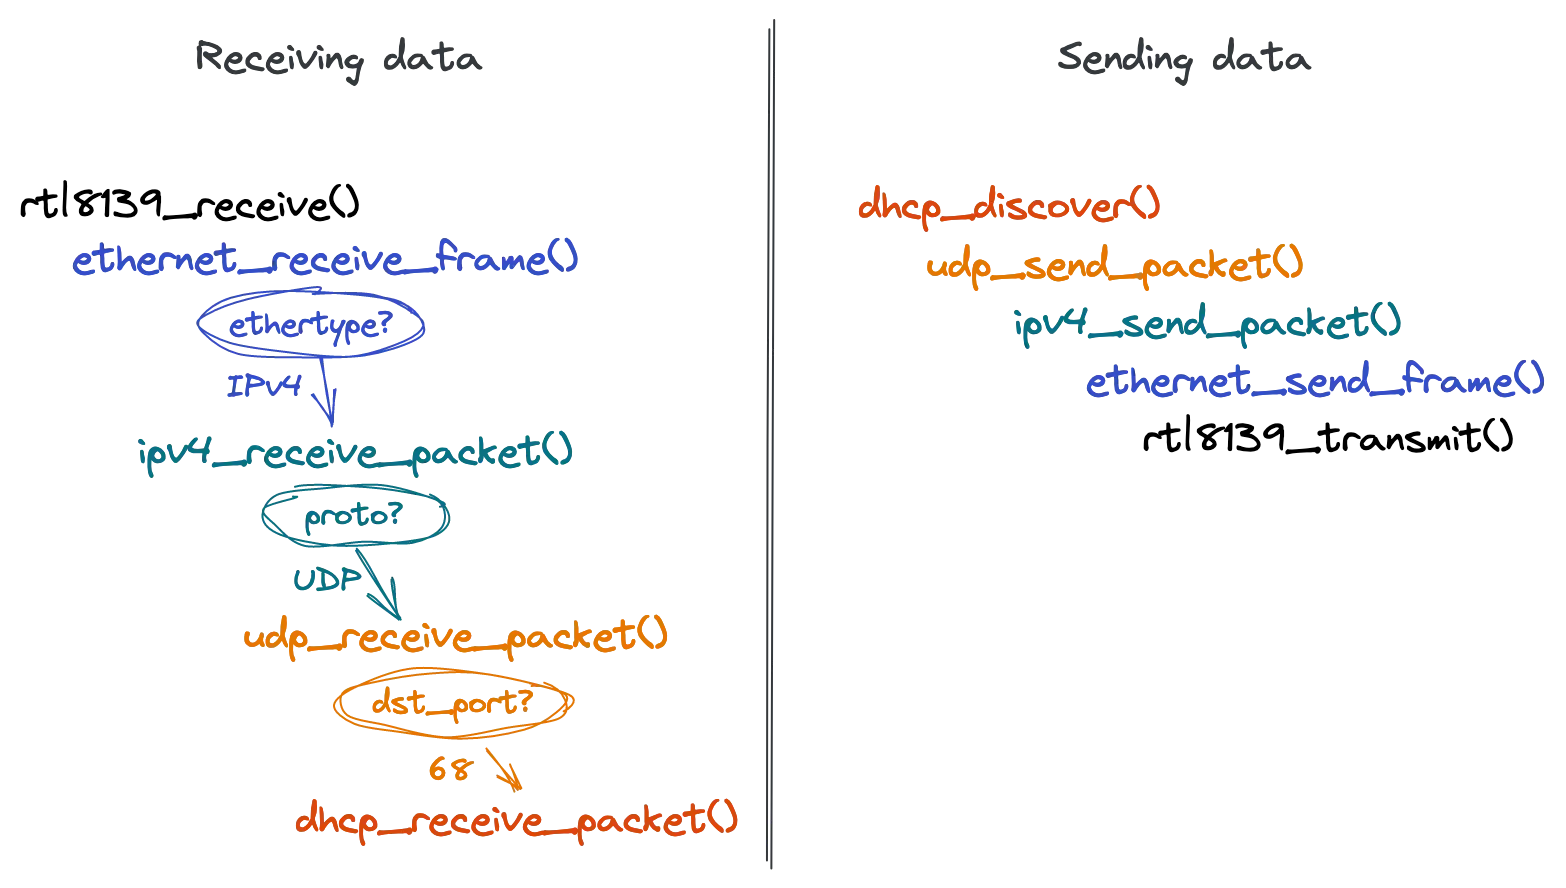 Figure 4: The DHCP implementation exposes two public functions like most of the
other protocols implemented in ArvernOS
Figure 4: The DHCP implementation exposes two public functions like most of the
other protocols implemented in ArvernOS
The DHCP implementation in ArvernOS follows the sequence described in the
previous section (see: kernel/net/dhcp.c). This sequence starts with
a call to the dhcp_discover() function during the kernel initialization (near
the end). The implementation is fragile. It uses busy waiting and does not
handle errors at all but that seems to be okay for QEMU’s DHCP server:

In QEMU, ArvernOS automatically gets its network configuration from DHCP. That includes its own IP address as well as the IP address of the gateway and a single DNS server.
Conclusion
In a similar manner, I added enough of the Network Time Protocol (NTP) to
query a time server (see: kernel/net/ntp.c). TCP is the next big
chunk of work. I haven’t started yet and that seems a lot more involved. We’ll
see…
Other than that, ArvernOS is a toy project, not a production-ready kernel and it will never become one. If I had to build a new kernel or OS in the future, it wouldn’t be this project. As such, working on such features from scratch helps me gain deeper knowledge on various topics. That also allows me to appreciate existing solutions and give me a different perspective on things.
-
This used to be a link to a tweet from me:
I received my very first DNS packet in reply to a query crafted with my very own network stack ❤️
In other words, my little kernel is finally able to talk to the Internet and I am extremely happy!
[there was a picture with ArvernOS in QEMU and Wireshark]
-
This used to be a link to a tweet from @b0rk:
life of a DNS query https://wizardzines.com/comics/life-of-a-dns-query/
Feel free to fork and edit this post if you find a typo, thank you so much! This post is licensed under the Creative Commons Attribution-ShareAlike 4.0 International (CC BY-SA 4.0) license.
Comments
No comments here. You can interact on Mastodon or send me an email if you prefer.