Introducing chipolata: a CHIP-8 interpreter
— Clermont-Fd, FranceA few weeks ago, I wrote a CHIP-8 interpreter named chipolata (you can take a look at the online demo here). This article gives a quick tour of this project.
CHIP-8 is a programming language that has been used to write video games on a few different platforms in the 70s-80s. There are tons of interpreters already, and mine isn’t fundamentally different I believe.
Context
One of my personal projects is a GameBoy emulator, which I initially started in order to learn more about emulators, graphics and Rust. This GameBoy project is currently unfinished and not publicly available. The truth is: I wasn’t very happy with some of the architecture decisions I made so I put it on hold. After a year of inactivity, I decided to work on a similar but a lot simpler project in order to (hopefully) solve some of my design issues and finish the emulator. The chipolata project was born.
I wrote chipolata in Rust (a programming language I don’t practice enough) and it is split into three components:
- a core library that contains the actual interpreter
- a cross-platform “desktop” application
- a web application powered by a WebAssembly module
The next three sections will give more information about each of these components.
Core library
The core library parses the content of a ROM file, which contains operation codes (“opcodes”). CHIP-8 has 35 opcodes only but implementing all of them still takes time. I used a test ROM to verify my implementation and I ported a tiny debugger that I wrote for the GameBoy emulator in order to double-check a few other things. Writing a debugger early in the process is always a good idea and it is useful even when the set of opcodes is relatively small.
An
Interpreter
struct, which is a facade,
exposes everything required to implement a “frontend” program. It’s worth
pointing out that the interpreter does not handle the main loop. Indeed, I
decided to leave this part to the frontend side because I found it easier to
make graphical output, sound and user input work together with the interpreter
when the frontend also controls the main loop.
The first frontend I implemented was the cross-platform desktop application.
Desktop application
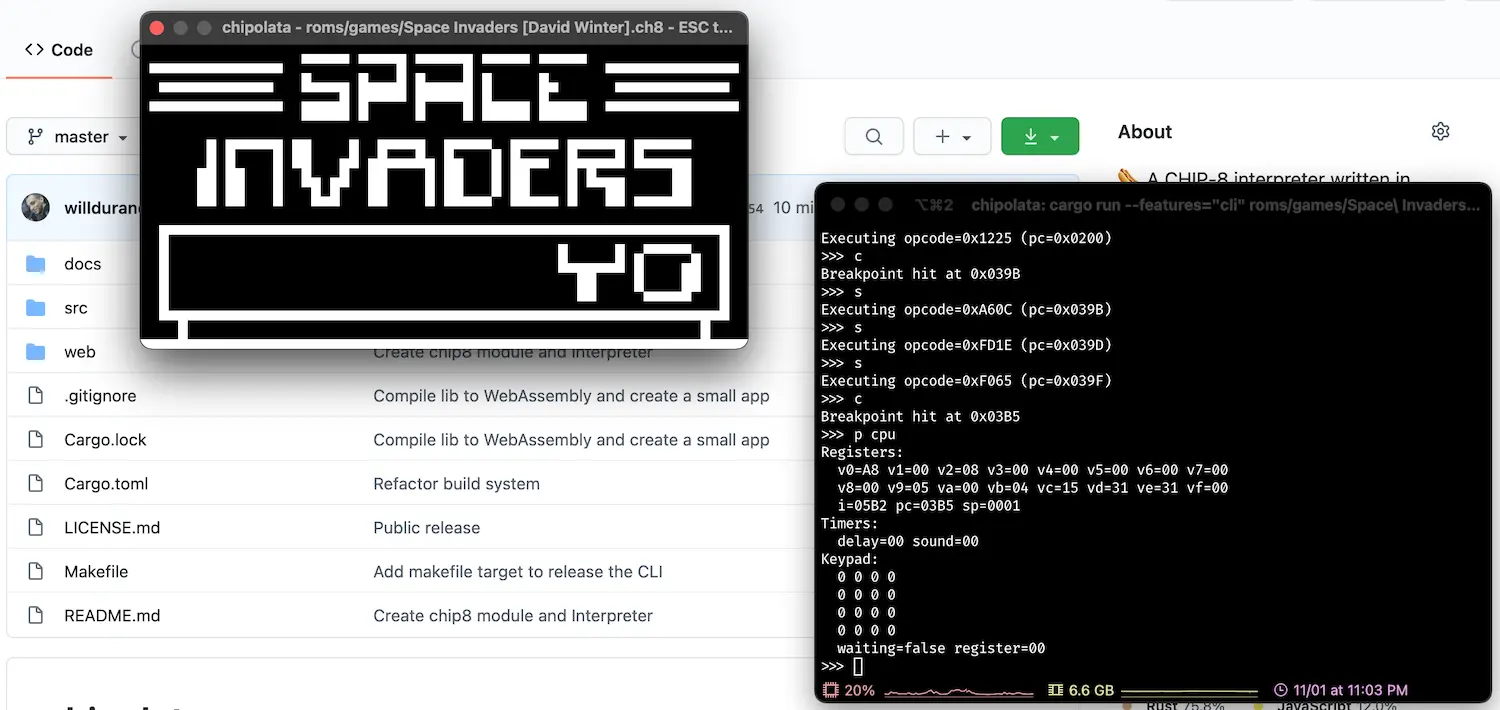
This is a separate program that relies on the core library and adds a graphical output thanks to minifb as well as audio support via rodio. The screenshot below shows the display on the left side and a terminal running the built-in debugger on the right side:
At this point, I could play different games and everything was working as I expected so I decided to try something new.
Web application
I created WebAssembly (WASM) “bindings” to expose the core library as a WASM module, which could then be used in a web application. I am not super familiar with WASM so this part took me a while to understand what was possible.
A new
JsInterpreter
struct decorates the core Interpreter one and contains the configuration
needed to compile a WASM module. I used
wasm-pack to build the final npm
package and I recommend this tool!
The web application allows users to play Space Invaders written by David Winter. I didn’t want to add other games because there are enough CHIP-8 interpreters online. Instead, I decided to implement different features such as a live view of the CPU registers and a disassembler.

The disassembler implementation is pretty naive, though. It reads the entire RAM
starting at the start address (0x200) and, for each opcode, it prints a
mnemonic (from this
list). This disassembler
does not handle odd addresses (which are possible because the specification
allows unaligned instructions) and it does not make the distinction between code
and data sections. I think a recursive traversal approach would be much better.
This project was also a good opportunity to become more familiar with the Web Audio API. CHIP-8 only needs a single “beep” sound. I implemented it using a 400Hz sine wave. Pretty cool what we can do in a browser these days!
What’s next?
First of all, I am pretty happy with the current state of this project.
I have some ideas for another rainy week-end without kids, though. For instance, I would like to find a way to move the debugger to the core library in order to implement it in the web application. The disassembler could also be rewritten in Rust and become a core feature.
In the back of my mind, being able to run this interpreter on ArvernOS would be a great achievement. I haven’t looked in details yet but I think it’s doable ;-)
Links
Here is a list of useful links I read while working on this project:
- https://en.wikipedia.org/wiki/CHIP-8
- http://www.multigesture.net/articles/how-to-write-an-emulator-chip-8-interpreter
- http://www.multigesture.net/wp-content/uploads/mirror/goldroad/chip8_instruction_set.shtml
- http://devernay.free.fr/hacks/chip8/C8TECH10.HTM
- https://tobiasvl.github.io/blog/write-a-chip-8-emulator
ℹ️ Feel free to fork and edit this post if you find a typo, thank you so much! This post is licensed under the Creative Commons Attribution-ShareAlike 4.0 International (CC BY-SA 4.0) license.